


Explore Companies BySectors & Categories
Explore Companies ByUse Cases
Explore Companies ByProducts & Services
Explore Companies ByRankings & Reviews
Featured NewsCompaniesMarketsCryptoTechRegulatoryCommentaryUKUSWorldMore

    Latest Wires

      Daily Newsletter

      LF Daily News

      Daily industry focused newsletter giving you an overview for the financial & finTech industry.

      See All Newsletters
      By clicking "Sign Up" you are agreeing to our Terms of Service and Privacy Policy

      GBP/JPY Price Action Forecast Update Today: How Did Key The Resistance Trigger the Massive Selloff?

      Published: just now

      GBP/JPY Price Action Forecast Update Today: How Did Key The Resistance Trigger the Massive Selloff?

      Post illustration


      In my previous analysis, “GBP/JPY Price Action Forecast: Is GBP/JPY Setting Up for a Major Sell-Off?”, I highlighted that GBP/JPY could continue lower if sellers successfully defended the 216.600–216.850 resistance zone and confirmed the bearish setup.


      The key question was simple:

      Could sellers defend the 216.600–216.850 resistance zone and trigger the next GBP/JPY sell-off?


      Key Takeaways:

      1. Sellers successfully defended the 216.600–216.850 resistance zone.
      2. A bearish weekly market structure shift sparked the massive drop.
      3. Multi-timeframe analysis confirmed a developing head-and-shoulders pattern.
      4. Waiting for confirmation rather than predicting the market proved critical.


      How Did the Previous GBP/JPY Price Action Signal the Sell-Off

      Post illustration


      In my previous GBP/JPY price action forecast, I explained that the higher-timeframe structure was beginning to favor sellers.

      The weekly chart had broken below a previous Higher Low (HL), signaling a potential shift from bullish to bearish market structure.


      At the same time, price was potentially forming a Lower High (LH) and the right shoulder of a broader head-and-shoulders structure.

      Instead of selling immediately, the higher-probability approach was to wait for GBP/JPY to retest the 216.600–216.850 resistance zone and look for confirmation that sellers were defending the area.


      The bearish setup required:

      1. GBP/JPY to retest the 216.600–216.850 resistance zone.
      2. Resistance to remain respected.
      3. Bearish candlestick rejection to appear.
      4. Sellers to regain control following the retest.
      5. Daily bearish market structure to remain intact.
      6. Price to confirm bearish continuation.


      The idea was simple:


      Don't chase the sell-off. Let price come into your area, wait for confirmation, and then react.


      Forecast Recap: The Two GBP/JPY Trading Scenarios


      Every trading plan should prepare for both bullish and bearish outcomes.

      The objective isn't to predict exactly what the market will do.


      The objective is to react when price confirms the setup.

      Before GBP/JPY made its next move, two scenarios were outlined around the 216.600–216.850 resistance zone.


      1. Bullish Scenario: Could a Breakout Trigger a Move Toward 217.350?


      Post illustration


      4H Timeframe Price Action Analysis. Bullish Bias Anticipation

      The alternative scenario required GBP/JPY to break decisively above the 216.600–216.850 resistance zone and successfully retest the area as new support.


      Bullish confirmation checklist:


      1. GBP/JPY breaks above 216.600–216.850.
      2. Price retests the broken resistance level.
      3. Previous resistance holds as new support level.
      4. Bullish candlestick rejection forms.
      5. Buyers regain control following the retest.
      6. Bullish momentum continuation is confirmed.


      Anticipated bullish trade idea:


      Post illustration


      4H Timeframe Price Action Analysis. Bullish Take Profit and Stop-loss Placement

      1. Target: 217.350
      2. Stop-loss: Below the newly confirmed support level
      3. Confirmation: Breakout + retest + bullish rejection
      4. Risk management: Use appropriate position sizing and predetermined risk


      Why was the bullish setup considered lower probability?


      The bullish scenario would have moved against the prevailing higher-timeframe bearish structure.


      The weekly structure had already shown signs of shifting bearish, while the daily chart remained in a downtrend.


      For buyers to regain control, GBP/JPY first needed to decisively break above 216.850 and prove that the former resistance area could hold as support.


      Outcome:


      Post illustration


      4H Timeframe Price Action Analysis. Price Failed to Follow our Bullish Anticipation

      ❌ Resistance did not produce a confirmed bullish breakout.

      ❌ No successful bullish break-and-retest developed.

      ❌ Buyers failed to establish sustained control above the resistance zone.


      2. Bearish Scenario: Could Resistance Trigger the Next Sell-Off?


      Post illustration


      4H Timeframe Price Action Analysis. Bearish Bias Anticipation


      The preferred trading plan was to look for selling opportunities if GBP/JPY continued rejecting the 216.600–216.850 resistance zone.


      Bearish confirmation checklist:

      1. GBP/JPY retests the 216.600–216.850 resistance level.
      2. Resistance level continues to hold.
      3. Bearish candlestick rejection develops around the area.
      4. Sellers regain control following the retest.
      5. Daily bearish market structure remains intact.
      6. Price confirms bearish momentum continuation.


      Anticipated bearish trade idea:


      Post illustration


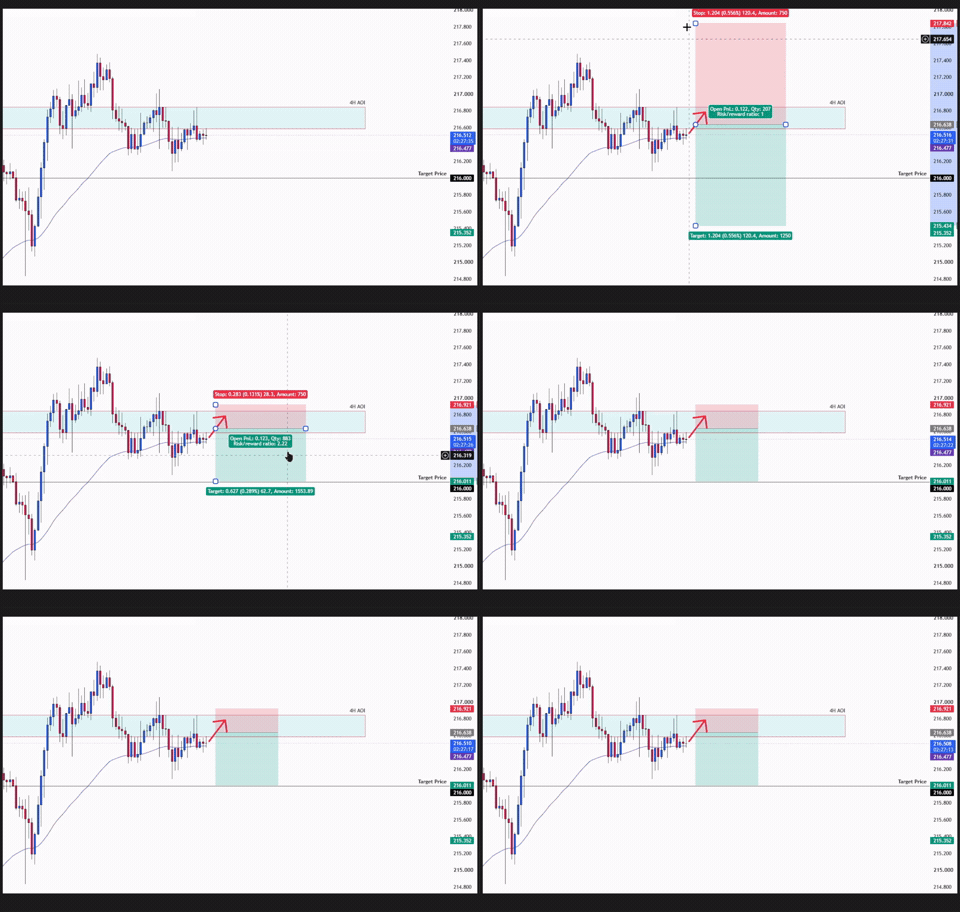
      4H Timeframe Price Action Analysis. Bearish Take Profit and Stop-loss Placement

      1. Target: 216.000
      2. Stop-loss: Above the confirmed resistance level
      3. Confirmation: Resistance retest + bearish rejection + continuation
      4. Risk management: Use appropriate position sizing and predetermined risk


      Why was the GBP/JPY bearish setup considered higher probability?


      The setup aligned with multiple layers of technical confluence.

      On the weekly chart, price had broken below the previous Higher Low, suggesting a bearish market structure shift.


      Price was also potentially forming a Lower High, while the broader structure showed signs of a developing head-and-shoulders pattern.

      On the daily chart, the bearish trend remained intact.


      Most importantly, GBP/JPY repeatedly struggled around the 216.600–216.850 4H resistance zone, showing that sellers continued to defend the area.


      This created a setup aligned with the broader bearish bias rather than trading against it.


      Outcome:


      Post illustration


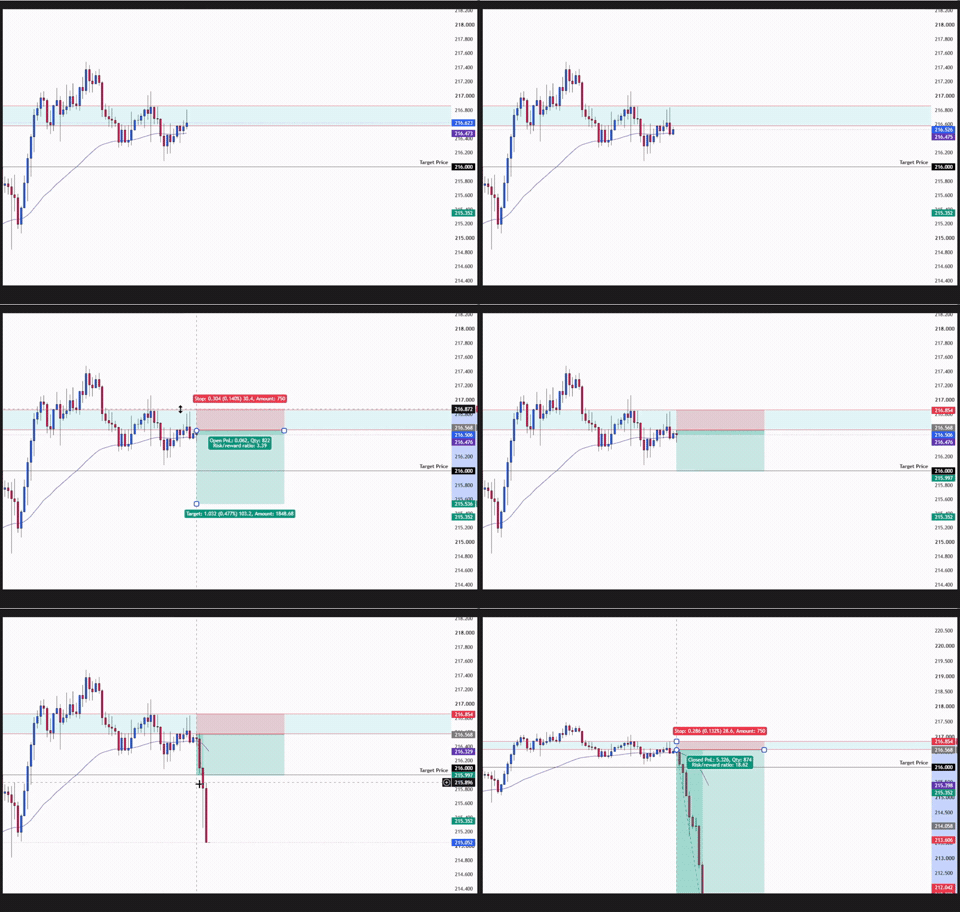
      4H Timeframe Price Action Analysis. Bearish Anticipation was Correct

      1. ✅ 216.600–216.850 resistance zone held.
      2. ✅ Sellers defended the key resistance area.
      3. ✅ Bearish rejection confirmed selling pressure.
      4. ✅ Daily bearish market structure remained intact.
      5. ✅ The higher-timeframe bearish bias remained valid.
      6. ✅ GBP/JPY moved lower following the rejection.
      7. ✅ The bearish scenario played out as anticipated.


      How Was This GBP/JPY Price Action Setup Successfully Executed


      Trade outcome: GBP/JPY respected the key 216.600–216.850 resistance zone, allowing sellers to regain control and maintain the broader bearish structure.

      Post illustration


      4H Timeframe Price Action Analysis. Bearish Anticipation was Correct


      The setup was based on the confluence of:

      1. ✅Clear market structure
      2. ✅ Well-defined support and resistance
      3. ✅ Breakout and retest confirmation
      4. ✅ Key levels
      5. ✅ Candlestick rejections
      6. ✅ 50 EMA trend confirmation
      7. ✅ Multi-timeframe confirmation
      8. ✅ Proper and realistic take profit and stop-loss placement
      9. ✅ Proper risk management


      The key lesson wasn't simply that GBP/JPY moved lower.

      The important part was how the setup was approached.

      Instead of selling simply because the overall bias was bearish, the analysis identified the exact area where sellers needed to prove they were still in control.


      The 216.600–216.850 resistance zone became the confirmation point.

      If sellers defended the area and bearish confirmation appeared, the bearish scenario remained valid.

      If buyers broke above resistance and successfully retested it as support, the bearish thesis would weaken and the bullish scenario could take control.


      This approach keeps the trading plan objective:

      Bias gives direction. Key levels give location. Confirmation gives execution.


      Why Multi-Timeframe Analysis Mattered for This GBP/JPY Setup

      One of the strongest parts of this GBP/JPY setup was the alignment across multiple timeframes.


      Weekly Timeframe


      Post illustration


      Weekly Timeframe Price Action Analysis. Before the Massive Sell-Off Occurred


      Post illustration


      Weekly Timeframe Price Action Analysis. Before the Massive Sell-Off Occurred

      The weekly chart provided the broader directional bias.


      The break below the previous Higher Low (HL) suggested that the bullish structure was weakening and a bearish transition could be developing.


      Daily Timeframe


      Post illustration


      Daily Timeframe Price Action Analysis. Before the Massive Sell-off Occurred


      Post illustration


      Daily Timeframe Price Action Analysis. Before the Massive Sell-off Occurred

      The daily chart supported the bearish outlook by maintaining its downtrend and showing continued selling pressure.


      4-Hour Timeframe


      Post illustration


      4H Timeframe Price Action Analysis. Before the Massive Sell-off Occurred

      Post illustration4H

      Timeframe Price Action Analysis. Bearish Take Profit and Stop-loss Placement

      The 4-hour chart provided the execution area.


      The 216.600–216.850 resistance zone gave traders a specific location to monitor for bearish confirmation rather than entering randomly.


      This is why multi-timeframe analysis can be valuable.

      The higher timeframe provides the direction.

      The lower timeframe provides the location and confirmation.

      When those factors align, traders can build a more structured trading plan.


      What Can Traders Learn From This GBP/JPY Setup


      This setup reinforces an important principle of price action trading:

      You don't need to predict every market move. You need a plan for how you will react when price reaches your level.


      The bearish bias alone wasn't enough to justify an entry.

      GBP/JPY still needed to reach the resistance zone and show evidence that sellers were defending it.


      That process was:

      Market Structure → Key Level → Retest → Rejection → Confirmation → Execution

      Having this sequence helps traders avoid chasing price and entering simply because they fear missing the move.


      The goal is not to catch every pip.

      The goal is to consistently execute setups that meet the conditions of your trading plan.


      Final Take


      This GBP/JPY Price Action Forecast Update demonstrates how combining market structure, support and resistance, multi-timeframe analysis, chart patterns, and candlestick confirmation can help traders build more structured trading decisions.


      The 216.600–216.850 resistance zone was the key area that determined whether GBP/JPY's bearish structure could continue.

      Sellers successfully defended the zone, bearish confirmation developed, and the bearish scenario remained aligned with the higher-timeframe structure.


      But the most important takeaway isn't simply that the forecast played out.

      It's the process behind it:

      Confirmation always comes before execution.

      Rather than chasing GBP/JPY lower or trying to predict the exact turning point, traders could wait for price to reach the predetermined area, observe how the market reacted, and execute only when the technical conditions aligned.


      No trading strategy guarantees that every trade will be a winner. However, consistently following a disciplined trading plan, waiting for confirmation, and applying proper risk management can help traders pursue greater consistency over the long term.


      Check Out my Contents:


      Beginners Path

      Build a strong trading foundation with step-by-step lessons designed for beginners:

      1. Beginner Trading Steps: 4 Rules to Follow Before You Trade
      2. Beginner Trading Steps: Mistakes That Can Slow Down Your Progress (And How to Avoid Them)
      3. The 1% Risk Rule: The Most Common Mistakes That Quietly Destroys 90% of Traders
      4. Habits of a Successful Traders: What are the 4 Ways to Build Discipline in Trading?
      5. Beginner Trading Guide: The Complete Beginner's Roadmap to Smarter Trading (Step-by-Step)
      6. A Complete Beginner's Guide: What are the Only Technical Trading System You Need to Trade Gold, Forex, Crypto, Commodities & Indices?

      Mastering The Art of Price Acton Trading

      Learn how to read market structure, identify key levels, and trade high-probability setups using pure price action.

      1. Why Price Action Trading Works: A Simple Framework You Can Use in Any Market
      2. Mastering Price Action at Key Levels: How to Identify and Trade High-Probability Setups on Key Levels

      Mastering Popular Forex Pairs Using simple price action strategy

      Ready to learn simple price action strategy? Here’s how to do it step by step:

      1. USD/JPY Analysis Today: Simple Trades, Clear Moves, for Beginners Using Price Action
      2. Simple Day Trade Price Action On EUR/USD: Why the Drop to 1.14190?
      3. Simple Price Action Analysis on EUR/CAD: EURCAD the Pair for the Week?
      4. Simple Price Action Strategy on USD/ CHF: 0.80000 the Key Ceiling for USD/CHF Sell?
      5. Price Action Analysis for GBPCAD Trade: A Potential Trade for This Week or Next Week?
      6. EUR/GBP Trading Guide: How to Spot High-Probability Setup a Week Ahead Using Simple Price Action Strategy?
      7. Simple Price Action Trade on CAD/JPY: 115.000 the Key Floor for CAD/JPY Buy?
      8. USD/JPY Price Action Outlook: Is 158.500 the Key Floor for a Potential New High?
      9. CAD/JPY Price Action Breakdown: We Anticipated the Move Twice to 116.500, Is Price Action Really the King?
      10. GBP/NZD Trade Ideas Using Simple Price Action Strategy: Will Price Drops to 2.28000?
      11. USD/JPY Technical Forecast: 158.500 Floor Retest for Preparing for New Highs?
      12. GBP/CHF Price Action Ideas: Is 1.05500 the Ceiling for a New Low?
      13. GBP/CAD Simple Forex Price Action Ideas: Is the 1.84500 Support Level Holding?
      14. AUD/USD Simple Price Action Forecast: Why Buy at 0.71700 Support Area?
      15. GBP/NZD Price Action Idea: Is GPB/NZD 2.3000 Key Floor for Bullish Continuation?
      16. GBP/USD Price Action: Trade Setups on a Ranging Market?
      17. USD/CAD Simple Price Action: Is 1.36500 the Key Bullish Floor?
      18. USD/CAD Price Action Ideas: Setting Up for the Next Bullish Push?
      19. EUR/JPY Price Action: Is It Retesting a Reversal Pattern?
      20. NZD/USD Forecast: Potential Consolidation Breakout on NZD/USD?
      21. AUD/JPY Price Action Forecast: Is AUD/JPY Setting Up for a Massive Sell?
      22. NZD/USD Price Action Forecast: Is a Reverse Double Top Pattern Forming?
      23. NZD/USD Price Action Forecast: Is a Reverse Double Top Pattern Forming?
      24. AUD/CHF Forex Price Action Idea: Are Sellers Defending the 0.56504–0.56200 Key Level?
      25. AUD/CHF Price Action Forecast: Price Breaks Below Consolidation, What's Next?
      26. EUR/USD Forecast Today: Can NFP News Today Push EUR/USD Down to 1.13000?
      27. EURCHF Price Action Forecast: Is a Bearish Double Top Signaling a Major Drop?
      28. EUR/USD Price Action Forecast Today: Will the 1.14150–1.14520 Resistance Trigger a Drop to 1.13500?
      29. EUR/USD Price Action Forecast Update Today: Is the 1.1410 – 1.4520 Resistance Level Still Potentially Trigger a Drop?
      30. GBP/AUD Price Action Forecast Today: Will the British Pound or Australian Dollar Come Out on Top?
      31. EUR/AUD Price Action Forecast Today: Will the 1.63930 Support Trigger the Next Bullish Move?
      32. GBP/CAD Price Action Forecast Today: Will the 1.88260–1.87700 Support Zone Trigger the Next Bullish Move?
      33. EUR/AUD Price Action Forecast Update: Buyers Defended 1.63930 Support level, Was the Bullish Trade Confirmed?
      34. EUR/GBP Price Action Technical Analysis Today: Will the Double Top Trigger a Bearish Move?
      35. EUR/GBP Price Action: Will 0.85500 Resistance Trigger a Bearish Drop?
      36. GBP/JPY Price Action Forecast: Is GBP/JPY Setting Up for a Major Sell-Off?

      Master How to Identify Market Trend

      Learn how to identify bullish, bearish, and sideways markets using price action to make more informed trading decisions:

      1. A Guide to Master Price Action Strategy that Works in Any Market: How to Master the Trend in Trading Any Market
      2. A Guide to Master a Strategy that Works in any Market: The Structure of a Market Trend
      3. A Guide to Master a Price Action Strategy That Works in Any Market: Complete Guide on How to Trade with Market Structure + Support & Resistance (Step-by-Step)

      Learn of How to Identify Support and Resistance

      1. A Guide to Master a Strategy that Works in Any Market: How to Identify Support and Resistance Levels?
      2. A Guide to Master a Price Action Strategy That Works in Any Market: Complete Guide on How to Trade with Market Structure + Support & Resistance (Step-by-Step)

      Master How to use break & retest pattern

      Ready to learn and capitalize the repetitive patterns in the markets? Here’s how to do it step by step:

      1. Break and Retest: A Simple Repetitive Price Action Pattern?
      2. Break and Retest: How to Capitalize Repetitive Patterns in Trading?
      3. EUR/JPY Price Action: Is It Retesting a Reversal Pattern?
      4. False Breakouts: How to Avoid Breakout Traps and Trade Smarter?

      Master How to Use Candlestick Confirmation & Patterns

      Discover how candlestick patterns can help confirm market direction:

      1. The Top Japanese Candlestick Patterns to Trade: Mastering Japanese Candlestick Confirmation + Pairing with Price Action Analysis
      2. The Top Japanese Candlestick Patterns to Trade: How to Use the Engulfing Candlestick as a High-Probability Entry Signal
      3. Bullish and Bearish Pin Bar Candlestick: The Complete Guide to Trading Reversal Candlestick Confirmations

      Master the Art of Trading Trend Reversal Patterns

      1. Reversal Chart Patterns: The Complete Guide to Spotting Bullish and Bearish Trend Reversal Pattern in Trading

      Mastering the 50 EMA

      1. Master Exponential Moving Average: How to Trade using EMA Indicator with Price Action Analysis?

      Learn How to Trade Gold

      Gold is still one of the most traded assets, here’s how to trade it with confidence:

      1. XAUUSD Price Action: A Beginner Buy Setup for Next Week
      2. How to Trade Gold Using Simple Price Action Outlook: 4500 the Key Zone for XAUUSD Buys?
      3. The Simplest Way to Trade XAU/USD Using Price Action Analysis: Buy and Sell Anticipation on Gold?
      4. XAU/USD Price Action: Will Gold Rally to $4,900 Today?
      5. Gold (XAU/USD) Price Action Forecast: Will XAU/USD Drop to $4650?
      6. Gold (XAU/USD) Trade Ideas: A Simple Price Action Analysis on Gold This Week?
      7. Gold (XAU/USD) Price Action Idea: A High-Probability Trade Setup on Gold?
      8. Gold XAU/USD Price Action Idea: Is a Bullish Momentum Coming?
      9. Gold (XAU/USD) Price Action Ideas: Will News Trigger a Breakout or Consolidation on Gold?
      10. How to Step-by-Step Swing Trade Gold (XAU/USD) with Pure Technical Price Action Analysis?
      11. Gold XAU/USD Price Action Forecast: Anticipating a Consolidation Breakout on Gold Again?
      12. Gold XAU/USD Price Action News Forecast Today: Can XAU/USD Break Above the $4,200–$4,190 Resistance Zone or Hold?
      13. Gold XAU/USD Forecast Update Today: How the $4,200–$4,190 Resistance Zone Triggered the Selloff?
      14. Gold (XAU/USD) Price Action Forecast Update Today: Is the Double Top Pattern Signaling Another Gold Selloff?
      15. Gold (XAU/USD) Price Action Forecast Update Today: Did the Double Top Pattern Trigger the Massive Selloff?
      16. Gold (XAU/USD) Price Action Forecast Update Today: Could Gold Price Still Drop to $3,930?
      17. Gold XAUUSD Price action Forecast: Is the Gold Breakout the Next Big Move?
      18. Gold (XAU/USD) Price Action Forecast Update Today: Did the $4,375–$4,320 Support Zone Trigger the Next Bullish Rally?

      Swing Trading 101

      1. How to Step-by-Step Swing Trade Gold (XAU/USD) with Pure Technical Price Action Analysis?

      Learn How to Trade Crypto with Price Action Strategy

      1. Bitcoin BTC/USD Price Action: Could Bitcoin Still Keep Dropping?
      2. Bitcoin (BTC/USD) Price Action Insight: Could Bitcoin Still Drop to $58,000?
      3. Bitcoin (BTC/USD) Forecast Update: Has the $58,000 Correction Ended?
      4. BTC USD Price Action Forecast Today: Is the $66,070 – $65,470 Resistance the Key to Bitcoin's Next Move?
      5. BTC/USD Price Action Forecast Update Today: Did the $66,070–$65,470 Resistance Trigger Bitcoin's Next Move?
      6. Bitcoin (BTC USD) Price Action Forecast Today: Could Bitcoin Still Drop to $60,000?
      7. Ethereum (ETH/USD) Price Action Forecast: Is the Break Above $2,450–$2,200 Triggering ETH’s Next Massive Bullish Move?
      8. Litecoin USD (LTC USD) Price Action Forecast: Is Litecoin a Buy-and-Hold Opportunity Near $50?

      Mastering Trader's Mindset

      Your mindset is what separates steady growth from costly mistakes. Focus on these essentials:

      1. Trading Mindset: Why Trading Exposes Who You Really Are?
      2. Consistency in Trading is Key: Why Discipline Beats Intelligence?
      3. Overtrading: Why More Trades Do Not Mean More Profits?
      4. Trading Wick Outs: How to Handle Fake Outs and Market Losses?
      5. Trading Psychology: The Truth About Trading Success
      6. Deliberate Practice in Trading: Why Intentional Practice Beats More Screen Time?
      7. Trading Psychology: Why Most Traders Struggle With Consistency? (And It Has Nothing to Do With the Market)
      8. Mastering the Three Pillars of Profitable Trading: Risk Management, Trading Strategy, and Trading Psychology
      9. The Mental Game of Trading: How to Overcome Trading Hesitation and Execute Trades with Confidence?
      10. Emotional Neutrality in Trading: The Secret Weapon of Consistent and Discipline Traders
      11. How to Become an Anti-Fragile Trader: Turn Losses, Drawdowns, and Pressure Into Strength
      12. Building an Anti-Fragile Trading Mindset: Build Discipline and Manage Risk

      Professional Trader's Mindset Masterclass

      Develop the mindset of a professional trader by mastering discipline, emotional control, patience, and consistency to achieve long-term trading success:

      1. Trading Psychology: Why the Mindset of a Profitable Traders Separates from Everyone Else?
      2. The Professional Trader's Mindset: 6 Psychological Traits Every Consistently Profitable Trader Needs

      Take-Profit and Stop-Loss Placement Guide

      Learn how to set TP and SL levels to manage risk, protect your capital, and plan better trades.

      1. Take-Profit Order (TP): A Beginner’s Guide to Better TP Targets

      Risk Management Series

      Learn the essential risk management strategies to protect your capital, manage losses, and trade with confidence:

      1. Risk Management in Trading: What Is the Secret to Long-Term Trading Success?
      2. Risk Management 101: The 20% That Determines Whether You Survive, Scale, and Succeed in Trading

      Learn Position Sizing

      1. Master Position Sizing in Trading: 5 Rules to Protect Your Capital and Grow Your Account

      Beginner trading roadmap

      Not sure where to begin? Here’s a simple roadmap to guide you:

      1. Common beginner Traders Mistakes → avoid overtrading, revenge trading, and chasing the market.
      2. Master Traders Psychology → build discipline, patience, and emotional control
      3. Mastering Risk Management → learn how to have a sustainable trading.
      4. Master Simple Technical strategies & Indicators → especially price action, key levels, and market structure.
      5. Applying to Real Market → forex, crypto and indices.


      By building step by step; from basics → real trading → mastering the craft, you’ll gain clarity, confidence, and steady progress without ever feeling overwhelmed.


      Follow me for more daily market and educational insights!

      Ruffy Grant B. Capacio - LinkedIn | Telegram | YouTube

      ACY Securities - Discord


      Disclaimer:

      Trading forex and derivative instruments involves substantial risk and may not be suitable for all individuals. Only use funds that you are prepared to lose. It is important to understand how these markets work and the risks involved before trading, and to seek independent financial advice if needed. All market analysis and insights shared are intended for educational and informational purposes only and should not be considered financial or investment advice. September 4, 2026.

      ACY Securities is one of Australia's fastest growing multi-asset online trading providers, offering ultra-low-cost trading, rock-solid execution, technologically superior account management and premium market analysis.

      This content may have been written by a third party. LiquidityFinder makes no representation or warranty and assumes no liability as to the accuracy or completeness of the information provided, nor any loss arising from any investment based on a recommendation, forecast or other information supplies by any third-party. This content is information only, and does not constitute financial, investment or other advice on which you can rely.
      Comments
      Most Recent
      Written By
      Daily Newsletter

      LF Daily News

      Daily industry focused newsletter giving you an overview for the financial & finTech industry.

      See All Newsletters
      By clicking "Sign Up" you are agreeing to our Terms of Service and Privacy Policy
      RSS Feeds

      Create a custom RSS Feed

      Select the categories and companies you wish to follow directly to your person rss feed.

      Create Custom RSS Feed

      Related Categories:

      Related Tags:

      #ProviderNews#TradingPlatform#FinTech#MarketNews

      Related Articles:

      Find The Right Partners for
      Your Trading Business

      Sign up and join over 5,000 professional members who receive personalized news alerts, curated professional connections, and more for free!

      Create Your FREE Account
      Get access to latest news, updates, real-time data, brokerage and trading firm insights and customized information feeds.

      Read our USD/JPY technical analysis to see why the bearish market structure points lower. Will the 157.724 resistance hold?

      just now

      AUD/CHF price forecast examines resistance at 0.58201–0.58365, a head-and-shoulders retest, and confirmation for targets at 0.57732 or 0.58750.

      just now

      A technical and fundamental analysis of the S&P 500 ahead of key economic releases, highlighting critical support levels and Federal Reserve catalysts.

      just now

      iFX EXPO Asia 2026 is almost here. Meet the Your Bourse team at Super Booth 97 in Hong Kong from 7–9 October.

      just now

      ATARIA CRM is a centralized platform designed for fintech teams to manage account operations, verification, fund management, and support in one place. With desktop and mobile access, it helps businesses stay connected, organized, and efficient.

      just now

      EUR/AUD hits the 1.60500 target after rejecting 1.61715–1.62300 resistance. Review the bearish price action setup and why trade confirmation mattered.

      just now

      Get an inside look at how rising Treasury yields and sector shifts into healthcare are impacting S&P 500 market dynamics, technical levels, and key economic drivers.

      just now
      Feed